Basic Recording with Audacity
If you are just getting started recording digital audio Audacity is a free program that will let you get up and running quickly. The following is a quick guide for getting started. I've actually had better luck with the newer beta version than the "stable" version. You can download Audacity here.
1. Plug in your microphone via usb, the mic in on your sound card, or a usb or firewire audio interface.
2. Set your audio input to your microphone source under preferences. In this case I am using a Blue Snowball usb microphone. Click the image below for a larger view.

3. In the preferences under Quality (on the left), make sure sample rate is set to at least 44,100 hz and bit rate is set to at least 16 bit. 16 bit, 44,100 hz is CD quality audio and in most cases works great for speech. You should be able to leave the rest of the settings as they are.
Click the image below for a larger view.

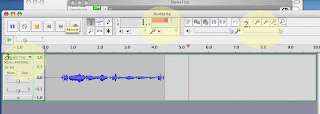
4. Close the preferences and make your recoding. You can basically push the vcr-style record button and start talking. On the image below, label number one is the level meter. Make sure this stays below zero all times. If you don't, you will get digital distortion which sounds terrible. If you are not staying below zero on the level meter, lower your input levels by dragging the input level slider to the left (label number two in the image below). Also, confirm you are recording at 16 bit, 44,100 hz mono (label 3 in the image below). If you are not, go back to the preferences and fix this.

5. After recording save the files and make a backup to CD, DVD or another hard disk. If you want to use the recording in another application choose File -> Export as wav (or aiff). To send it over the Internet to someone else for post-processing, choose File-> Export as mp2 (yes that's mp2 not mp3). Mp2 files compress to about 25% of the size of the original with almost no quality loss.
Have fun!
1. Plug in your microphone via usb, the mic in on your sound card, or a usb or firewire audio interface.
2. Set your audio input to your microphone source under preferences. In this case I am using a Blue Snowball usb microphone. Click the image below for a larger view.

3. In the preferences under Quality (on the left), make sure sample rate is set to at least 44,100 hz and bit rate is set to at least 16 bit. 16 bit, 44,100 hz is CD quality audio and in most cases works great for speech. You should be able to leave the rest of the settings as they are.
Click the image below for a larger view.

4. Close the preferences and make your recoding. You can basically push the vcr-style record button and start talking. On the image below, label number one is the level meter. Make sure this stays below zero all times. If you don't, you will get digital distortion which sounds terrible. If you are not staying below zero on the level meter, lower your input levels by dragging the input level slider to the left (label number two in the image below). Also, confirm you are recording at 16 bit, 44,100 hz mono (label 3 in the image below). If you are not, go back to the preferences and fix this.

5. After recording save the files and make a backup to CD, DVD or another hard disk. If you want to use the recording in another application choose File -> Export as wav (or aiff). To send it over the Internet to someone else for post-processing, choose File-> Export as mp2 (yes that's mp2 not mp3). Mp2 files compress to about 25% of the size of the original with almost no quality loss.
Have fun!